An AI explainer video for teachers should make a difficult idea easier to see. It should not invent the lesson, replace the teacher’s judgment, or turn a worksheet into a talking slideshow. The strongest workflow begins with material the teacher already trusts, such as a lesson plan, reading, set of notes, article, slide deck, or approved source.
The video then has a narrow job. It might show how meiosis differs from mitosis, why the phases of the moon change, how a bill moves through a legislature, or what happens when a variable changes in an equation. In each case, the useful visual is the relationship or sequence, not a generic person holding a textbook.
This guide explains where AI video fits in lesson preparation, how to choose the right format, how TapVid differs from avatar and stock-video tools, and what a teacher should review before a video reaches students.
Where an AI Explainer Video for Teachers Fits
A classroom video is most useful when the learning objective benefits from controlled pacing and visual change. Students can pause, replay, and revisit a short explanation, while the teacher can use class time for questions, discussion, practice, or feedback.
Good uses include:
- Visualizing an invisible process: cell division, plate tectonics, electrical current, supply and demand, or a data pipeline.
- Showing a sequence: the water cycle, a historical chain of events, an experiment, or a mathematical method.
- Comparing related ideas: mitosis and meiosis, metaphor and simile, renewable and nonrenewable energy, or mean and median.
- Preparing a flipped lesson: students watch a focused explanation before class, then use class time for application.
- Creating a recap: a short review connects the key ideas from a unit without replaying an entire lecture.
- Supporting substitute or asynchronous instruction: the teacher’s approved explanation remains available even when the class is not meeting normally.
Some jobs need a different format. If students must copy exact steps in a software interface, a screen recording is more honest and useful. If the message depends on a familiar instructor speaking directly to the class, record the teacher. If a safety procedure requires a real demonstration, use verified live footage. AI motion graphics are strongest when the difficult part is the concept itself.
Start With One Learning Objective
The biggest planning error is asking one video to teach an entire chapter. A short explainer needs a single destination that can be checked.
“Students will understand photosynthesis” is too broad. “Students will be able to explain how light energy contributes to the production of glucose” gives the video a clearer job. “Students will understand the Civil War” is too broad. “Students will identify how one event changed the likelihood of secession” creates a sequence that can be explained and discussed.
I use a three-line brief:
Audience: Who are the learners, and what do they already know?
Objective: What should they be able to explain, compare, identify, or do afterward?
Evidence: What question or task will show whether they understood?
The evidence line matters because it keeps the video connected to instruction. If the check asks students to label stages, the scenes should make those stages distinguishable. If the check asks students to explain cause and effect, the visual sequence should show the connection rather than list two facts separately.
Keep the source small enough to review. A lesson plan plus two approved readings is easier to control than a folder of mixed files. When sources disagree, resolve that disagreement before generation. The video tool should not decide which interpretation belongs in the curriculum.
Choose the Visual Format Before the Tool
“AI video” includes several formats that solve different teaching problems.
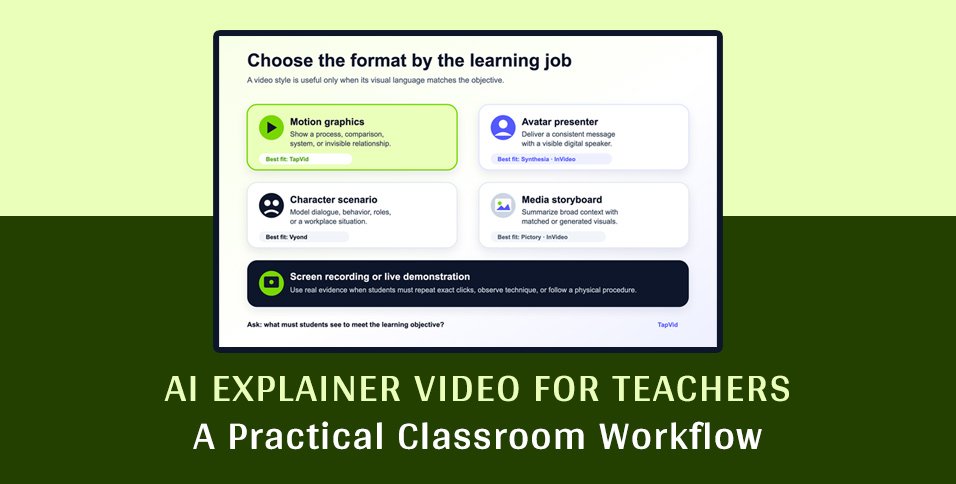
| Format | Best classroom job | Useful tools | Watch for |
| Motion-graphics explainer | Concepts, systems, comparisons, and sequences | TapVid | Every visual must support the approved explanation |
| Avatar presenter | Consistent lecture-style delivery and localization | Synthesia, InVideo | A digital face can distract from a dense diagram or process |
| Character scenario | Dialogue, behavior, social situations, and role-play | Vyond | More editing choices and the risk of oversimplifying people or cultures |
| Stock or generated-media storyboard | Quick summaries and broad contextual topics | Pictory, InVideo | Relevant-looking footage may not explain the learning mechanism |
| Screen recording or live demonstration | Exact clicks, lab technique, art process, or physical procedure | Screen recorder or camera | Interface changes, camera clarity, and safety details |
For abstract subjects, motion graphics have a practical advantage. They can show movement, scale, order, grouping, and cause-and-effect directly. The viewer’s attention can stay on the idea rather than on a presenter or a sequence of loosely related clips.
A Six-Step Lesson-to-Video Workflow
Step 1: Prepare a clean source packet
Use teacher-approved material only. Remove student names, grades, comments, accommodations, contact details, login information, and any other personally identifiable information. Replace student examples with fictional or fully de-identified examples.
The U.S. Department of Education advises teachers to check whether an online tool is approved by their school or district and to consult administrators or IT staff when an application may collect student information. Its FERPA guidance also emphasizes that services handling personally identifiable information from education records must meet specific control and use requirements.
For an explainer draft, the safest source packet usually contains no student data at all. A lesson objective, public reading, teacher-written explanation, and approved diagram are normally enough.
Step 2: Build a concept map
List the ideas in the order a learner needs them, not necessarily the order they appear in the textbook. Mark prerequisite knowledge, the main concept, the relationship between parts, one example, one common misconception, and the final check.
For meiosis, the map might begin with the purpose of cell division, distinguish chromosome copying from division, show the two rounds of division, and end with the resulting cells. For a historical topic, it might establish conditions, show an event, identify responses, and connect those responses to a later consequence.
This map is the guardrail for generation. If a scene introduces a term before it has been defined or skips a causal step, the teacher can point to the missing connection.
Step 3: Write a scene plan for listening and seeing
Give each scene one learning job. Write the narration beside the visual instruction. If the narration says that homologous chromosomes separate, the visual should show the separation and label the relevant structures. A generic laboratory clip would add atmosphere without explaining the event.
Use spoken language, but do not erase necessary terminology. Introduce the term, explain it in plain language, and then use it consistently. Keep on-screen text shorter than the narration. Labels, formulas, key phrases, dates, and step names belong on screen. Full paragraphs do not.
Add intentional pauses around difficult transitions. The goal is not to fit the maximum number of facts into two minutes. The goal is to make the chosen relationship understandable on first viewing and reviewable on replay.
Step 4: Generate the visual draft
TapVid is useful here when the source contains an explanation that should become motion graphics. The teacher can start from a prompt, script, document, PDF, article, or link, then state the audience and intended explanation. TapVid creates a scene-based draft with narration, captions, and a timeline inside Studio.
A published TapVid example uses meiosis as the subject. The project screen shows the source request, a generated lesson brief, a scene timeline, narration, captions, and a preview of the motion-graphics output. This is the product’s core scenario: taking existing knowledge and turning the sequence or relationship inside it into a visual explanation.
The output frame below is not a mock interface or a decorative stock image. It is an actual frame from the generated meiosis explainer. That distinction is important when evaluating an education tool. The product should be judged by what a student would see, not only by a polished landing-page illustration.
TapVid differs from common alternatives in what carries the lesson. Synthesia and InVideo can place an AI presenter in front of the script. Pictory can turn the text into a storyboard with matched or generated media. Vyond can create editable character and mixed-media scenes. TapVid focuses on source-aware motion graphics, so it is a better fit when the process, comparison, or concept should occupy the frame.
A teacher can use an AI explainer video generator to save assembly time, but the generated draft is still instructional material that requires professional review.
Step 5: Review in three passes
I would not review a classroom explainer by watching it once and asking whether it “looks good.” Use three separate passes.
Accuracy pass: Compare every spoken and displayed claim with the approved sources. Check dates, names, definitions, labels, formulas, units, examples, pronunciation, and transitions that imply cause and effect. If the video simplifies a concept, confirm that the simplification does not make it false.
Learning pass: Watch as a student who has the stated prerequisite knowledge. Does each scene prepare the next one? Is the difficult transition visible? Does the example actually match the rule? Does the video address the common misconception or accidentally reinforce it?
Media pass: Watch once without audio, then read the captions without the visuals. This reveals decorative scenes, missing labels, caption errors, fast text, low contrast, and places where the narration carries information the student cannot recover visually.
Only after those passes should the teacher adjust color, music, voice style, and transition polish.
Step 6: Add a learning check
A video is a resource, not evidence of learning. End with a short prompt that matches the objective. Ask students to predict the next step, explain the relationship in their own words, compare two cases, label a diagram, identify an error, or apply the idea to a new example.
Avoid asking only “Did you understand?” That question does not reveal the misconception. The check should make the student’s model visible enough for feedback.
When the video is used before class, bring the check into the opening activity. When the video is used during class, pause before the reveal and ask for a prediction. When it is used for review, provide a transcript or key-term list so students can return to the language of the lesson.
How TapVid Differs From Other Classroom Video Tools
The most useful comparison is not “which product has more AI?” It is “which visual format matches the teaching problem?”
TapVid vs Synthesia: Synthesia is a stronger fit when a consistent avatar should present an approved lesson or training message, especially across languages. TapVid is a stronger fit when the concept, process, or comparison should be the main visual.
TapVid vs Pictory: Pictory is useful for repurposing an article or script into a quick storyboard with media, voices, captions, and other production elements. TapVid is more focused on organizing the reasoning in the source into motion-graphics scenes.
TapVid vs InVideo: InVideo is useful when an AI actor, stock media, voiceover, and social pacing should carry the video. TapVid is a better fit when generic b-roll would distract from a precise academic mechanism.
TapVid vs Vyond: Vyond is useful for role-play, character behavior, and training scenarios that benefit from detailed scene editing. TapVid asks for fewer manual animation decisions and focuses on a structured explainer draft.
TapVid vs screen recording: A screen recorder is better for exact interface steps. TapVid is better for explaining why the steps matter, how a process fits together, or what an abstract system is doing.
Privacy, Accuracy, and Accessibility Checks
UNESCO’s guidance on generative AI in education recommends a human-centered, age-appropriate approach and highlights data privacy, ethical validation, and pedagogical suitability. Those principles translate into a practical classroom checklist.
- Use approved tools: Follow district or institution policy before uploading materials.
- Exclude student PII: Do not upload identifiable education records merely to personalize an example.
- Keep a source record: Store the source packet, script, review date, and final export together.
- Verify every claim: Treat fluent narration as a draft, not proof.
- Check representation: Review generated people, examples, accents, names, and cultural details for stereotyping or misleading context.
- Provide captions: Correct line breaks, timing, technical terms, speaker labels, and sound information when relevant.
- Provide another route: A transcript, notes, or static diagram helps students review the material in a different format.
- Check readability: Use sufficient contrast, large labels, limited text, and enough time to read formulas or diagrams.
- Disclose the format when useful: Students should not be misled into thinking an AI avatar or generated scene is a real person or historical recording.
Privacy rules and school policies vary by context. The Department of Education’s practical advice is a sound default: ask whether the service is approved, understand what it collects, and involve the appropriate administrator or IT representative before student information is processed.
A Pre-Class Quality Checklist
- The video names or clearly supports one learning objective.
- The source packet contains approved material and no student PII.
- Every scene has one identifiable learning job.
- Technical vocabulary is introduced and used consistently.
- Visuals show the relationship, process, or evidence described by the narration.
- Dates, names, formulas, labels, units, examples, and pronunciation have been checked.
- Captions match the final voiceover.
- Text is readable on the smallest device students will use.
- The video has a transcript, notes, or another suitable access route.
- A question or task checks the stated objective.
- The final export has been watched from beginning to end.
Final Recommendation
An AI explainer video for teachers works best as a visual layer on top of sound instructional judgment. Start with a narrow objective and trusted source material. Choose motion graphics for concepts and processes, an avatar for presenter-led delivery, character animation for scenarios, and real recording for exact actions.
TapVid is the most relevant option when a teacher already has the knowledge in a lesson, article, document, script, PDF, or link and wants that source translated into a visual sequence that shows how the concept works. Its value is not that AI replaces lesson planning. Its value is that the teacher can move from approved content to a scene-based draft, review the explanation, and revise the weak scene without manually animating the entire video.
The final standard is simple: the video should help students see the idea more clearly, preserve the accuracy of the source, protect their information, and give the teacher a useful way to check understanding.
Frequently Asked Questions
What is the best AI explainer video tool for teachers?
It depends on the lesson format. TapVid fits concepts, comparisons, and processes that benefit from motion graphics. Synthesia fits avatar-led delivery. Vyond fits character scenarios. A screen recorder fits exact software procedures.
Can teachers make an explainer video from a lesson plan or PDF?
Yes. A lesson plan, article, script, document, PDF, or link can provide the source. Remove student information, define one objective, and check every generated claim against the approved material.
Should teachers upload student work to an AI video tool?
Not by default. Use fictional or de-identified examples and follow school or district policy. The U.S. Department of Education advises teachers to confirm whether a service is approved and consult administrators or IT staff about tools that may collect student information.
How long should a classroom explainer video be?
Use the shortest length that teaches the chosen objective and includes the necessary example or misconception check. Do not set the duration from the number of pages in the source.
Does an AI-generated classroom video need captions?
Yes. Review caption accuracy, timing, line breaks, terminology, and speaker or sound information where relevant. Also provide a transcript, notes, or another suitable way to access the lesson content.